Last updated: Aug 25, 2023
In today’s digital age, ensuring your Apple TV operates at its peak efficiency, you must keep tvOS, Apple’s TV operating system, up to date. Regular updates not only enhance security features but also optimize overall app performance, while addressing any unforeseen technical challenges. This comprehensive guide will take you through both manual and automatic update processes, empowering you to enjoy a seamless viewing experience. Now let’s thoroughly examine each stage of the process.
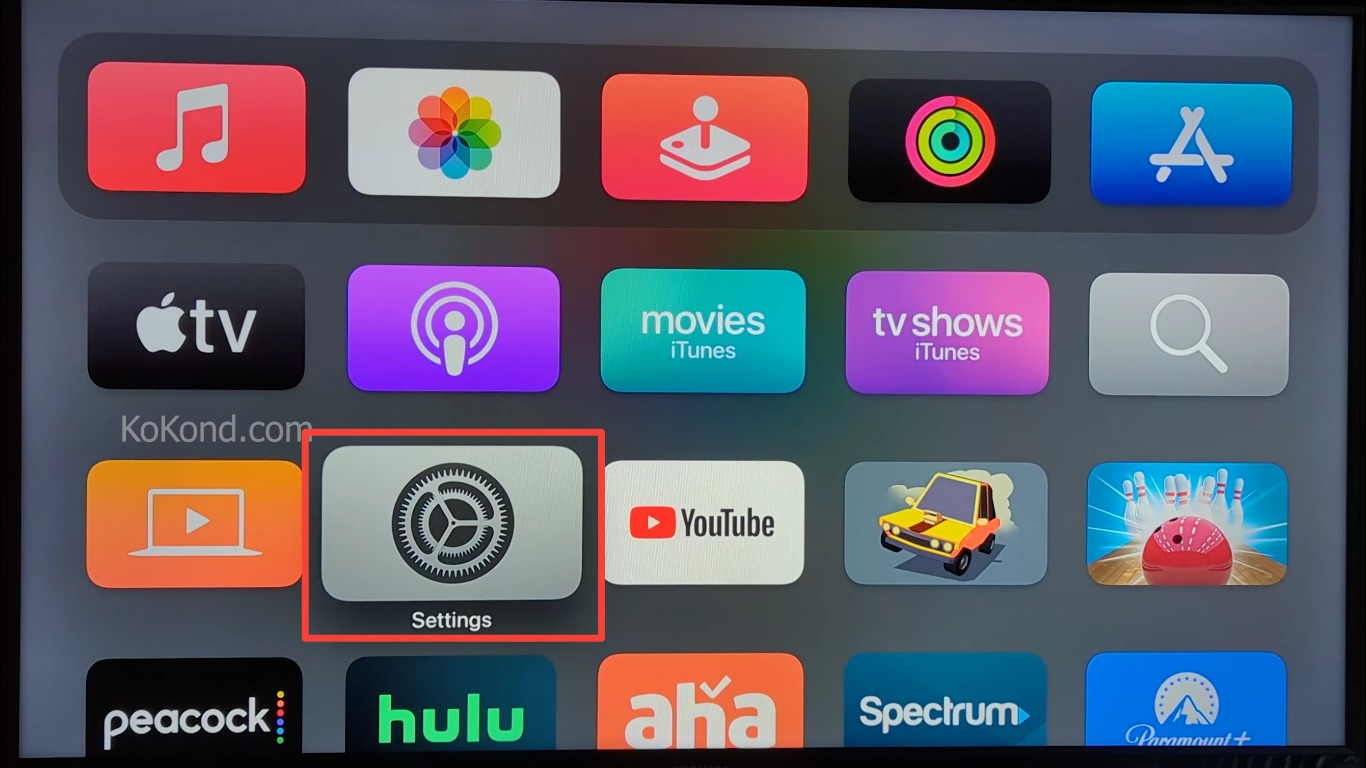
Step 1: Open Settings on Your Apple TV
To kickstart the update process, begin by navigating to the “Settings” option on your Apple TV’s home screen using your remote. Navigate to settings on the home screen of your Apple TV. And then, launch it.
Step 2: Select System
Select system from the settings menu by scrolling down. This step sets the foundation for accessing critical update-related options.
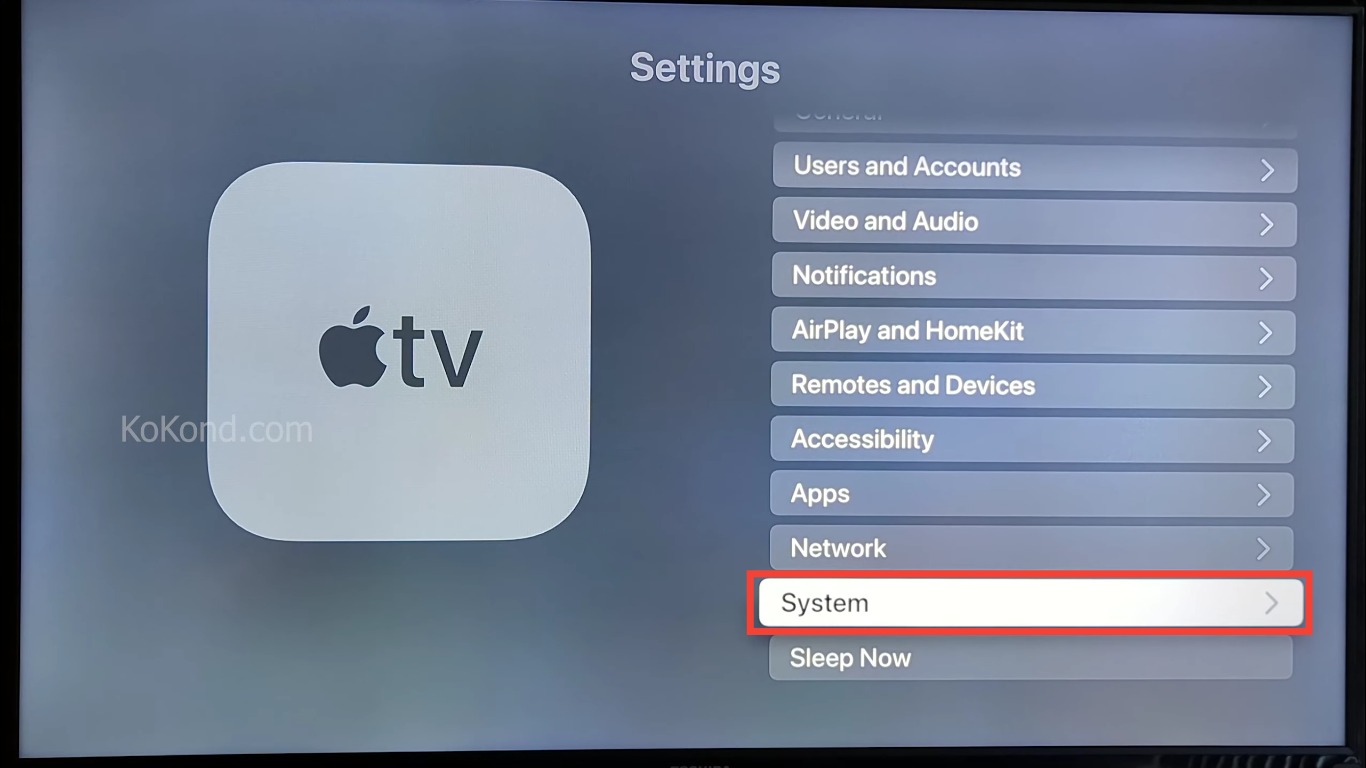
Step 3: Select Software Updates
Select system from the settings menu by scrolling down. This step sets the foundation for accessing critical update-related options.
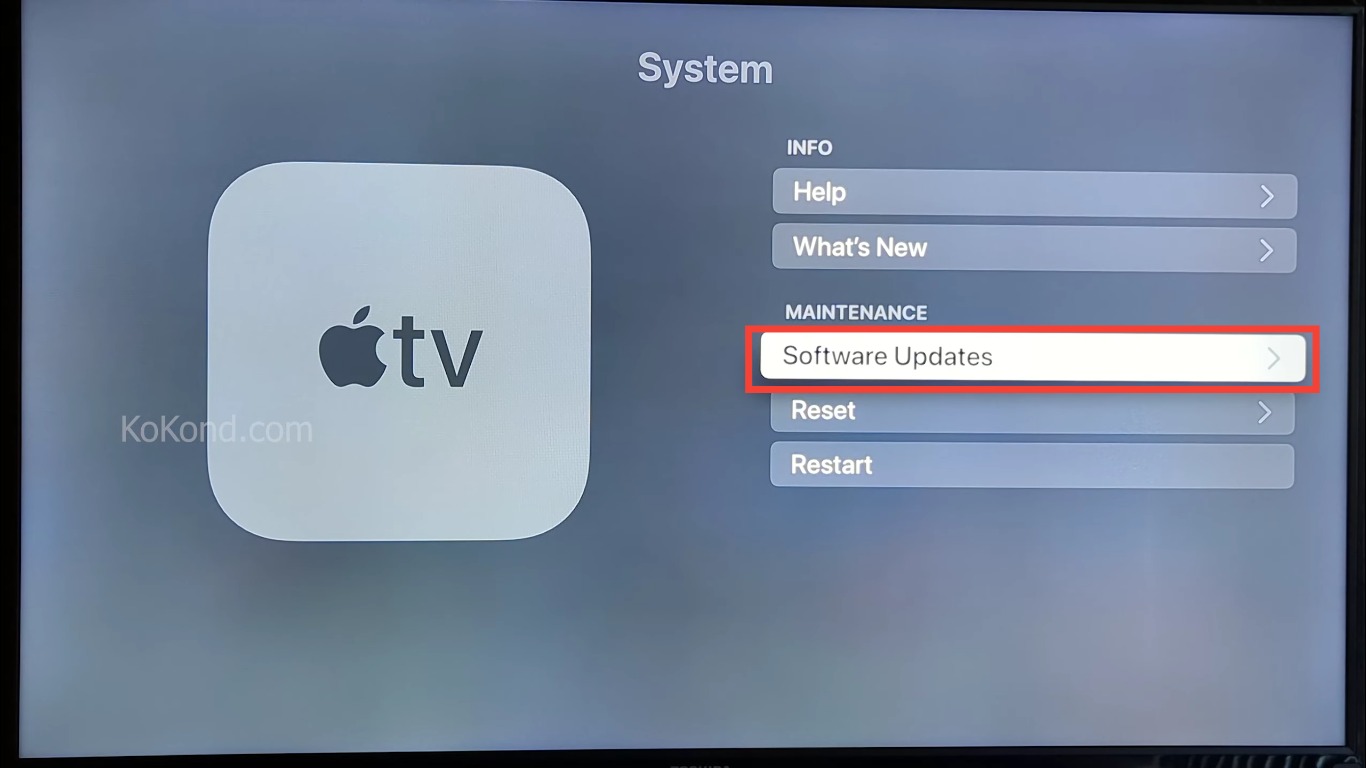
Step 4: Select Update Software
The Software Updates menu will appear on the following screen. Here, choose Update Software, preparing your Apple TV for the latest improvements and optimizations.
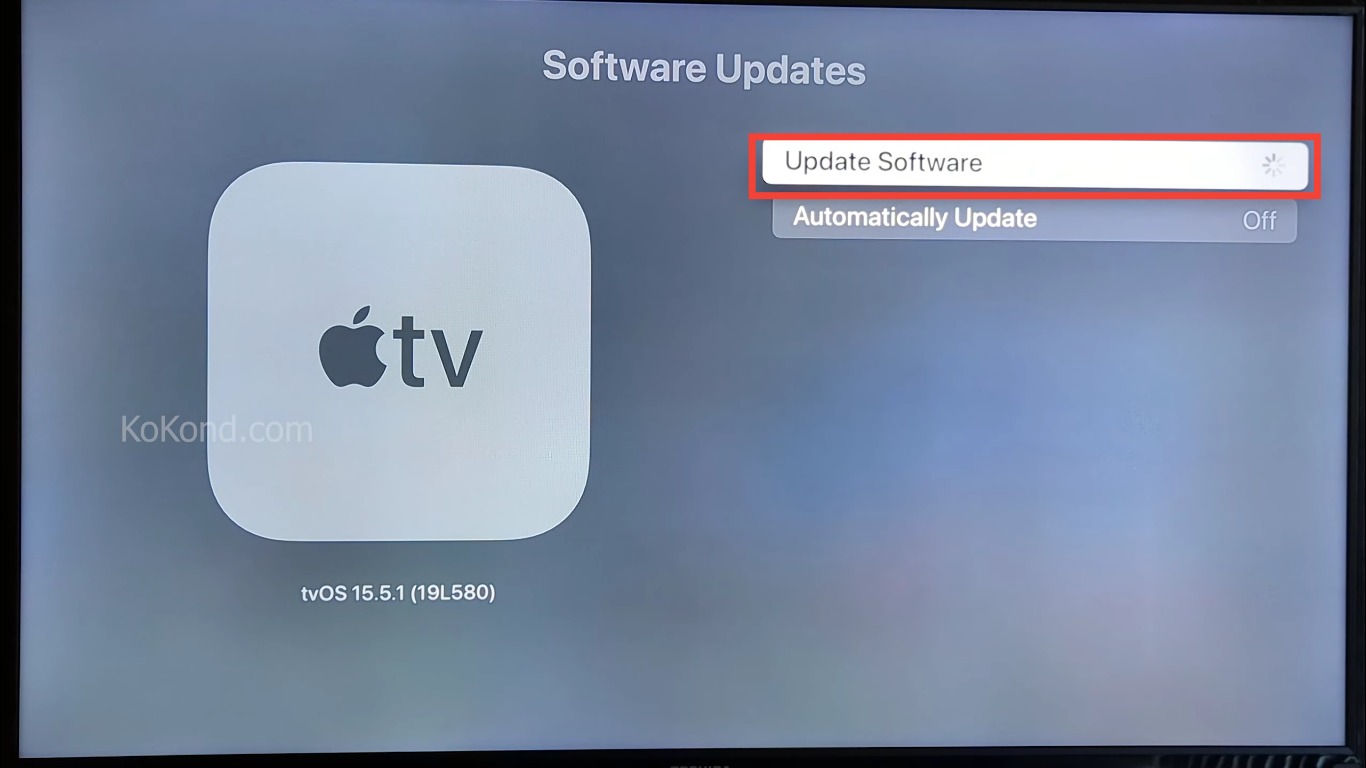
Step 5: Select Install
Now, your Apple TV will look for any available updates. On the following screen, if there are any, they will be displayed. Here, you must choose install.
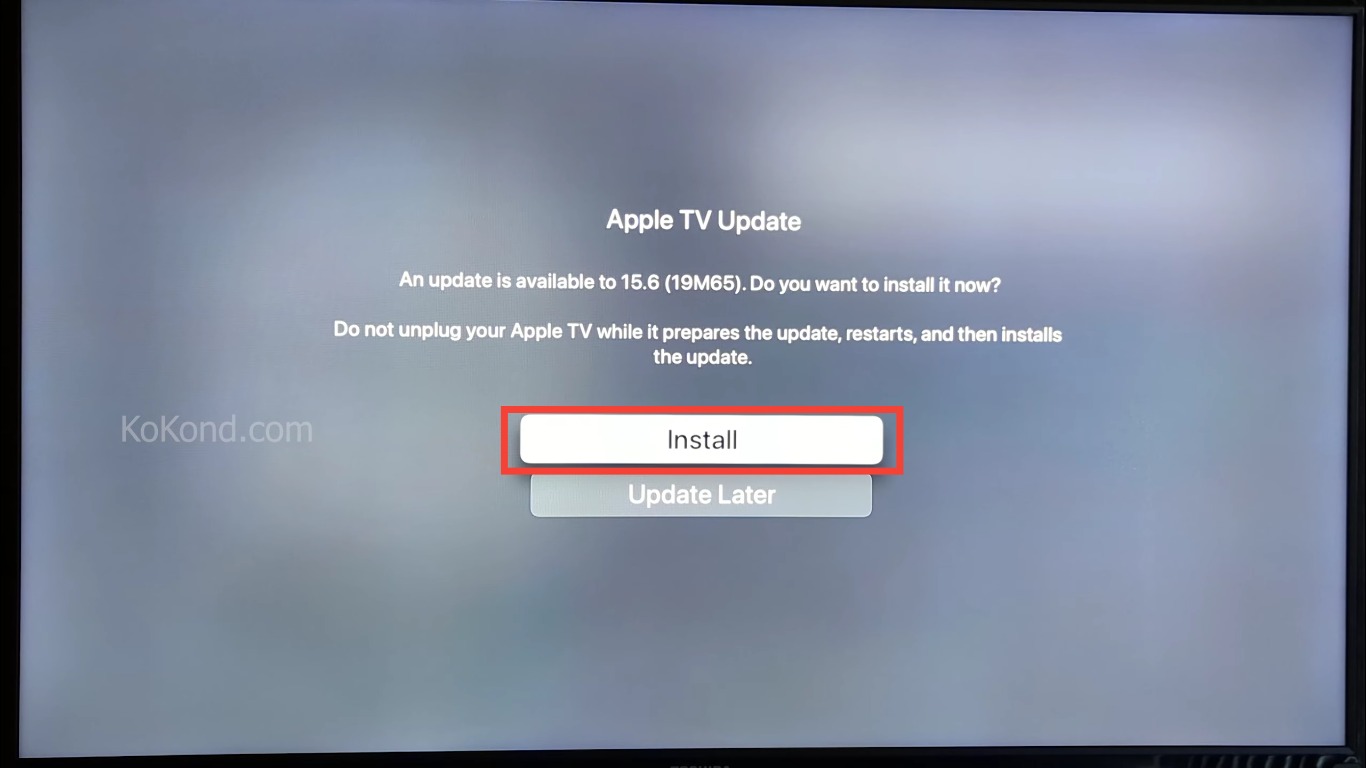
Your Apple TV will display that it is up to date if there are no updates.
Addition: User-Friendly Interface
The user-friendly interface ensures a hassle-free navigation through the update process, making it accessible even to those less familiar with technology.
Step 6: Updating Message
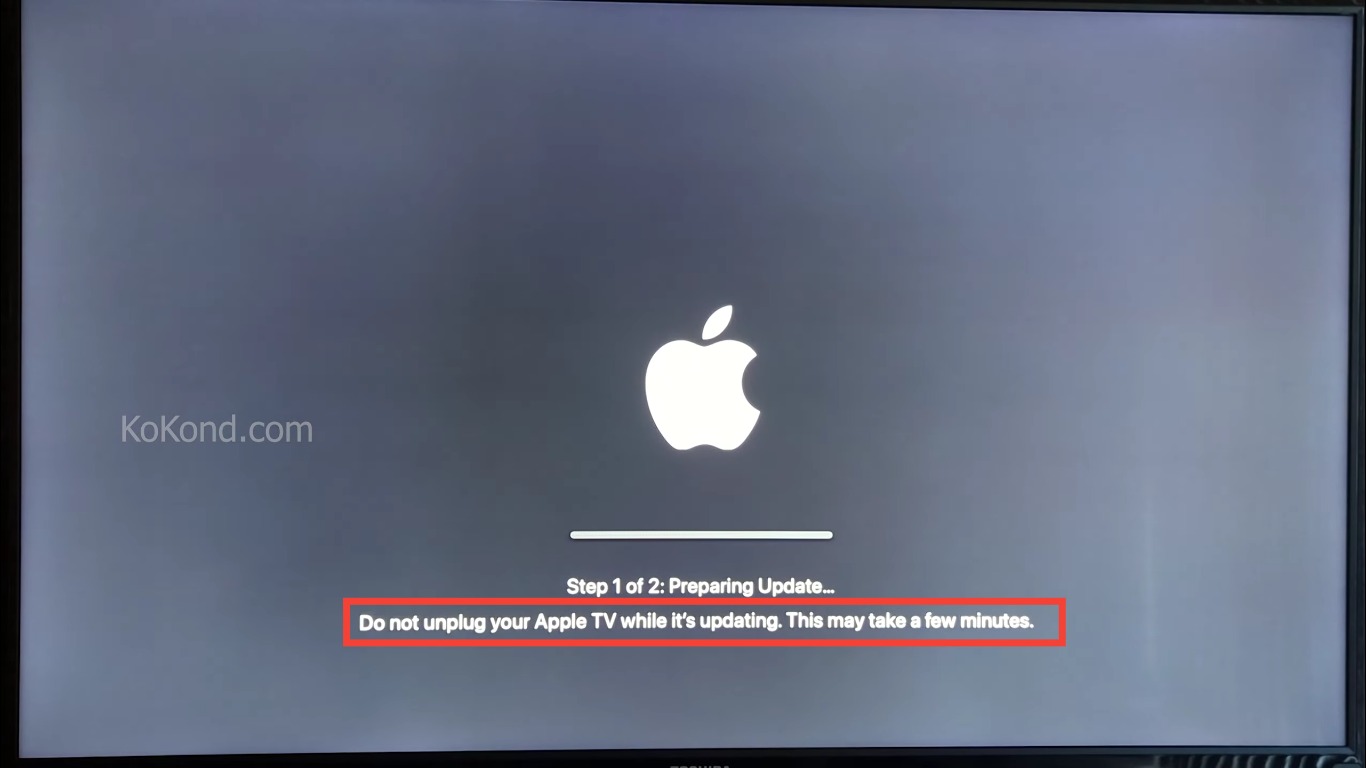
A notice stating that your Apple TV is being updated will show up on the screen once you click install. Remember not to unplug your Apple TV while the update is running. During this period, a little light will be blinking on the screen. It will require a while to complete updating.
Patience and Safety
Exercise patience during the update, and rest assured that the blinking light signifies a safe and gradual process. Interrupting the update could lead to complications, so exercise caution.
Automatically Updating Your Apple TV
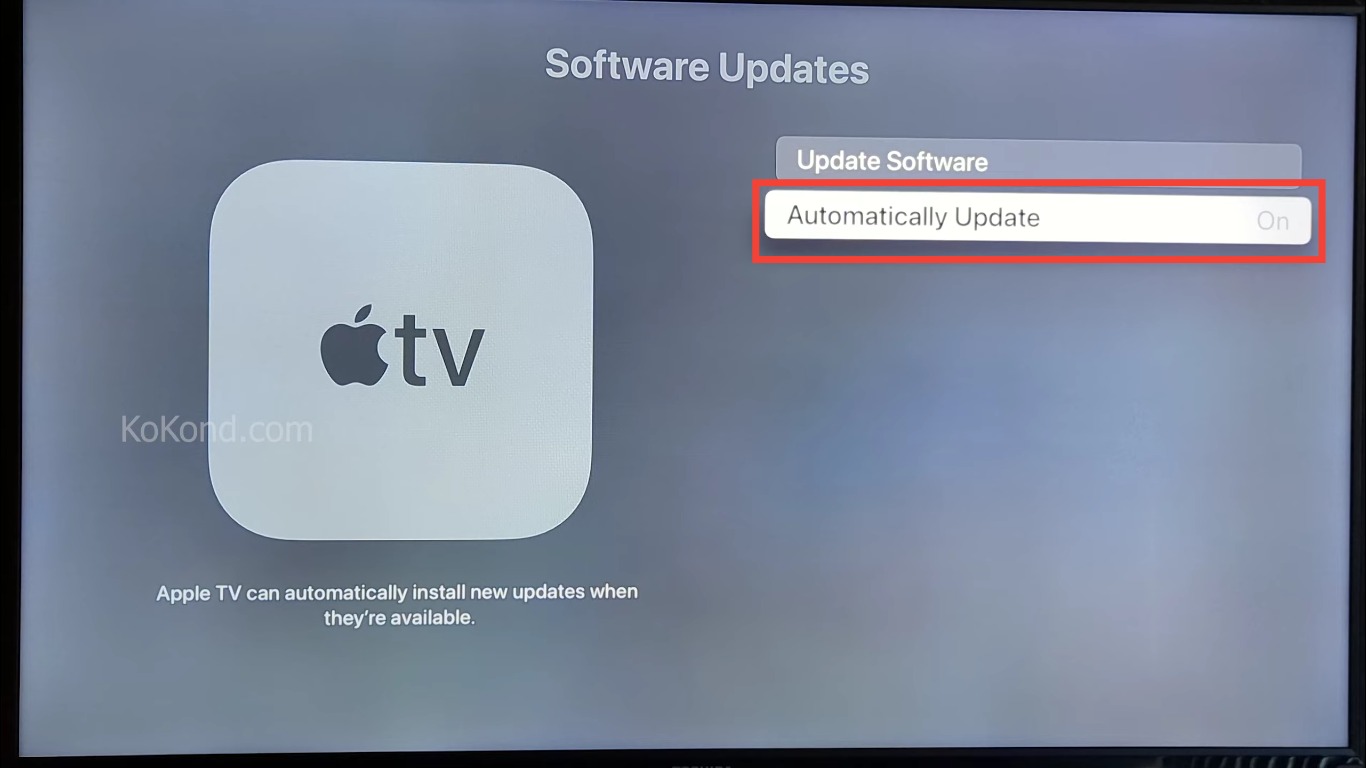
To ensure a consistent approach to updates, consider enabling automatic updates on your Apple TV. Select Automatically Update under Settings > System > Software Updates. The automatic updates will begin as a result.
The “Automatically Update” feature takes the effort out of manual updates, providing a convenient way to keep your Apple TV optimized without any intervention.
Here are some extra points to enhance your knowledge about updating and optimizing Apple TV:
Backup Your Data Before Updating: Before initiating any software update, it’s always a good practice to back up your important data, settings, and preferences. This ensures that in case anything goes wrong during the update process, you won’t lose your valuable content.
Check Release Notes: Encourage users to check the release notes for each update. Apple often includes information about new features, bug fixes, and improvements in these notes. This helps users understand what changes they can expect after updating.
Updating Over Wi-Fi: Emphasize the importance of updating over a stable Wi-Fi connection to ensure a smooth and uninterrupted download and installation process. Using cellular data might not be ideal due to potential data usage limits and speed constraints.
Managing Storage Space: Mention that before updating, it’s a good idea to ensure that your Apple TV has enough available storage space. Large updates might require a certain amount of free space to complete successfully.
Troubleshooting Update Issues: Provide a brief section on what to do if users encounter issues during the update process. This might include restarting the device, checking the internet connection, or contacting Apple Support if necessary.
Personalizing Automatic Updates: Explain how users can personalize the automatic update feature by scheduling updates during specific hours when the TV is likely to be idle. This minimizes any potential inconvenience.
Checking Update Status: If users are unsure whether an update is still in progress or if it’s completed, guide them on how to check the update status or version of the tvOS in the settings menu.
Factory Reset as a Last Resort: In rare cases where an update has caused significant issues, users can consider performing a factory reset. However, stress that this should only be done as a last resort after exhausting all other troubleshooting options.
Staying Informed: Encourage users to stay informed about Apple TV updates by subscribing to official Apple newsletters or forums. This way, they can stay ahead of any major announcements or changes in the update process.
Feedback and Bug Reporting: Encourage users to provide feedback to Apple if they encounter any issues after an update. This feedback helps Apple identify and address bugs more effectively in future updates.
Frequently Asked Questions
Here are some frequently asked questions (FAQs) that can be helpful.
Why should I bother updating my Apple TV?
Updating your Apple TV’s operating system (tvOS) ensures that you’re benefiting from the latest features, security patches, and performance enhancements. It helps keep your device running smoothly and securely.
How often does Apple release updates for Apple TV?
Apple typically releases tvOS updates several times a year. These updates can include new features, bug fixes, performance improvements, and security enhancements.
Can I update my Apple TV automatically?
Yes, you can enable automatic updates for your Apple TV. By doing so, your device will download and install updates in the background, ensuring you’re always up to date without manual intervention.
What if I want to update manually?
You can manually check for updates and install them by navigating to “Settings” > “System” > “Software Updates” > “Update Software” on your Apple TV. This gives you more control over when updates are applied.
How long does it take to update my Apple TV?
The duration of an update can vary depending on the size of the update, your internet connection speed, and the processing power of your Apple TV. Updates can take anywhere from a few minutes to half an hour or more.
Can I use my Apple TV while it’s updating?
It’s generally recommended to avoid using your Apple TV while an update is in progress. Let the update complete without interruption to ensure a successful installation.
Will updating erase my data?
No, updating your Apple TV should not erase your data. However, it’s always a good idea to backup your important data before performing any updates, just in case.
Conclusion
Updating your Apple TV, whether manually or automatically, is a straightforward process that empowers you to extract the best performance from your device. While manual updates offer a hands-on approach, the “Automatically Update” feature caters to those seeking a more hands-free experience. By following this guide, you’ll not only enjoy a more efficient and secure Apple TV but also have the knowledge to effortlessly maintain its performance. Feel free to share these insights with your family and friends, ensuring everyone can benefit from a top-notch viewing experience.
Video

Passionate about tech gadgets, I turned my love into a blogging journey. Specializing in how-to articles, I unravel the intricacies of gadgets, providing step-by-step guides. Join me in exploring the tech universe, where every device holds endless possibilities. Let’s simplify the complexities and enhance your tech experience together.