Google Chromecast offers an automatic update feature which saves the hassle of manually updating applications. Enabling this option will ensure that whenever any app finds an update online, it will automatically download the update and install it. It is the best option if you want the applications to be updated at all times. This article will provide a detailed step-by-step procedure that will help to enable the automatic app update feature on Google Chromecast.
Step 1: Go to the home screen on your Google Chromecast
Switch on your Chromecast with Google TV and then go to the Home screen on your Google TV. If your Chromecast device is switched on, but you are not on the Home screen, click the “Home” button on your Chromecast Voice Remote to directly go to the home screen on your Chromecast with Google TV.
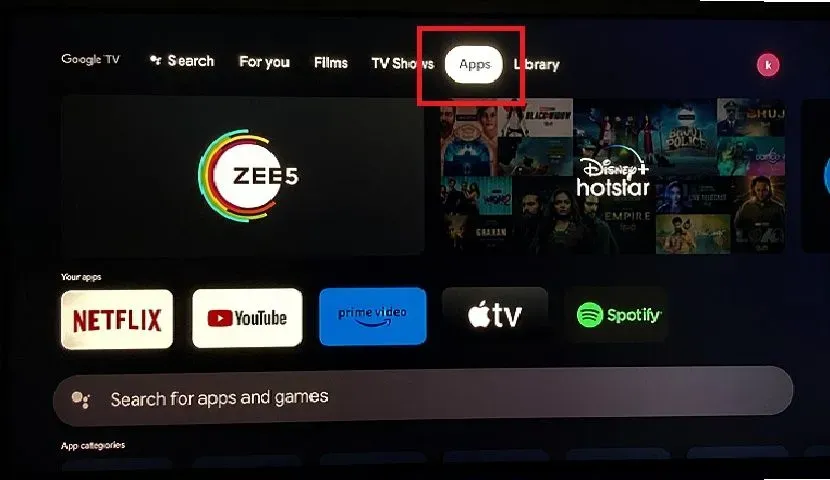
Step 2: Go to the Apps menu on your Home Screen
Scroll to find the Apps button at the top of the screen, between the Home and Library buttons. These options are conveniently positioned on the Home Screen of your Google Chromecast. Once you have located the Apps button, press OK to enter the Apps section. You will now have to access the Play Store in the Apps Section. You can also download and install new apps on your Chromecast with Google TV from this section.
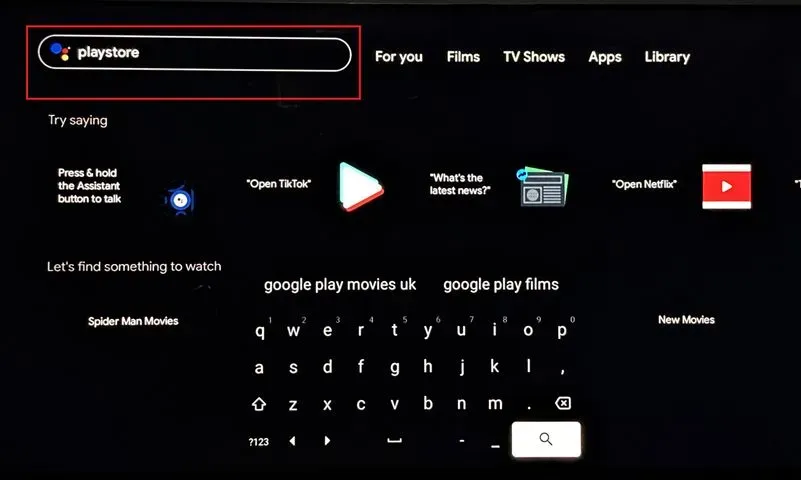
Step 3: Search for Google Play Store
Once you select the Apps menu, search for Google Play Store. To search for Google Play Store, you must toggle and then click on the search bar at the top left corner of the screen using the Directional Pad (D-Pad) on your Chromecast Voice Remote. Type in “Play Store” and search for the Google Play Store. Once you see the Play Store in the Apps tray below, select it by clicking on it. You can now access the Google Play Store on your Google Chromecast. From there, you can explore and download a wide range of applications, enhancing your Chromecast experience. Whether streaming services, games, or utilities, you can easily access the Play Store and expand your Chromecast’s functionality to suit your preferences.
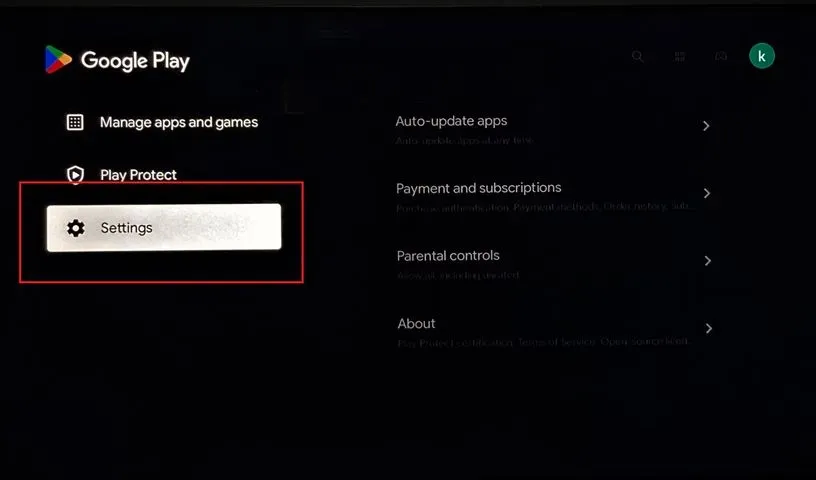
Step 4: Go to Settings
Once you have selected and opened the Google Play Store application, you will see a list of options on your screen, such as Manage apps and games, Play Protect, and Settings. Toggle and select the “Settings” option on this list using your Chromecast Voice Remote.
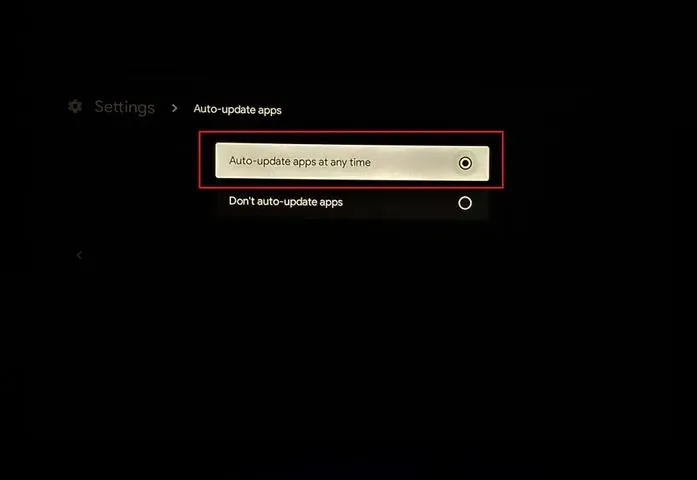
Step 5: Select Auto-update Option
After selecting the “Settings” option, Chromecast will take you to the settings menu. There, you will see multiple options, such as Auto-Update, Payment and Subscriptions, and Parental Control. Select the Auto-Update Option. The Parental Control option is an excellent way to safeguard your kids from accessing apps and content that are not age-appropriate, and we will talk about how to use parental controls on Google TV later in this article.
Step 6: Confirm the Selection
When you select the Auto-update option, you will be given two options under it to choose from, namely “Auto-update apps at any time” and “Don’t auto-update apps.” Select the former option to auto-update your apps. After confirming the selection, your Google TV will update the apps whenever new updates and versions of apps are released, and you will not have to update your apps manually on your Google Chromecast anymore. Enjoy the versatility of the device to its fullest!
How to Update Sony Google TV
This guide will walk you through updating your Sony Google TV. Keeping your device’s software up-to-date is essential for ensuring optimal performance, accessing new features, and improving security. Follow these steps to ensure you’re running the latest software version.
Step 1: Ensure a Stable Internet Connection
Before you begin, ensure your Sony Google TV is connected to a stable Wi-Fi network or wired Ethernet connection. A strong and uninterrupted internet connection is crucial for a successful update.
Step 2: Access the Home Screen
Turn on your Sony Google TV and navigate to the Home Screen. You can do this by pressing the “Home” button on your remote control. This step will take you to the main interface of your TV.
Step 3: Open the Settings Menu
To access the settings menu, scroll down to the bottom of the Home Screen. You’ll find the gearwheel-shaped icon labeled “Settings.” Use the remote control’s navigation buttons to highlight and select it. This option will open the settings menu.
Step 4: Navigate to “Device Preferences”
In the settings menu, you will find various options. Scroll down until you reach “Device Preferences.” This list is where you’ll find the system-related settings.
Step 5: Select “About”
Inside “Device Preferences,” scroll down until you find the “About” option. Select it to view information about your Sony Google TV.
Step 6: Choose “System Software Update”
In the “About” section, you’ll see various details about your device. Look for the “System Software Update” or “Software Update” option and select it. This menu is where you can initiate the update process.
Step 7: Check for Updates
Upon selecting “System Software Update,” your Sony Google TV will check for available updates. This process may take a few moments as the TV contacts Sony’s servers to determine if a newer software version is available.
Step 8: Download and Install the Update
If a software update is available, your TV will prompt you to download and install it. Follow the on-screen instructions to start the update process.
Step 9: Wait for the Update to Download
The update will begin downloading. The time it takes to complete will depend on the size of the update and the speed of your internet connection. Ensure that your TV remains connected to the power source during this process.
Step 10: Install the Update
Once the download is complete, your TV will prompt you to install the update. Confirm and initiate the installation process.
Step 11: Wait for the Installation to Finish
During the installation, your TV may reboot several times. This process is normal. Be patient and allow the process to complete.
Step 12: Verify the Update
After the installation is complete, your Sony Google TV will reboot. Once it’s back up, return to the “About” section in the settings menu to ensure that the software update was successful.
Step 13: Enjoy the Latest Features
Congratulations, you’ve successfully updated your Sony Google TV! You can now enjoy the latest features, improved performance, and enhanced security that the update provides.
Additional Tips:
- Automatic Updates: You can enable automatic updates to ensure your Sony Google TV stays up-to-date without manual intervention. Go to the “System Software Update” section in the settings menu and select “Auto Update Software.” Choose “On” to enable automatic updates. With this option enabled, your TV will check for updates and install them automatically when available.
- Scheduled Updates: You can also schedule software updates at a convenient time. In the “Auto Update Software” section, select “Scheduled Installation.” Choose a suitable time for updates to install without disrupting your viewing experience.
- Check for Updates Regularly: It is a good practice to manually check for updates occasionally, even if automatic updates are enabled. New updates may contain critical improvements or features you’d like to access immediately.
- Internet Connection: Ensure a stable, high-speed internet connection when downloading and installing updates. Slow or unreliable connections may lead to update failures.
- Backup: While rare, there is a slight chance that an update could encounter issues. It’s a good idea to back up your important data, settings, and preferences before initiating a major update. This way, you can restore your TV to its previous state if needed.
These steps and tips will keep your Sony Google TV running smoothly with the latest software updates. Enjoy an improved entertainment experience and explore all the features your TV has to offer.
Frequently Asked Questions
Why should I enable the auto-update feature on my Chromecast with Google TV?
Enabling auto-updates on Chromecast with Google TV is crucial for several reasons. Firstly, it ensures that your system is regularly patched with security updates, safeguarding it against vulnerabilities and cyber threats. Additionally, it simplifies the update process, saving you time and effort. For businesses, auto-updates are vital to maintain a secure and efficient network. They guarantee that all devices within the corporate network are consistently updated, reducing the risk of security breaches. Overall, enabling auto-updates on your Chromecast with Google TV is smart for users, as it enhances system security and keeps operations running smoothly.
How can I enable my Chromecast device to give me daily updates?
To enable Chromecast to provide daily updates, follow these simple steps:
- Open the Google Home app on your Android device.
- Tap your Chromecast device.
- In the top-right corner of the screen, tap Settings.
- Scroll down and select “Notifications.”
- Under “Daily updates,” tap “Weather.”
- Toggle on the switch next to “Send me weather every day.”
By following these steps, your Chromecast will provide daily weather updates, helping you stay informed about the weather forecast effortlessly.
What are the benefits of having auto-update turned on?
With auto-update turned on, your Chromecast with Google TV will receive the latest security and feature updates automatically, ensuring that your device is up to date and functioning optimally.
Is it safe to enable auto-update on my Chromecast with Google TV?
Yes, it’s safe to enable auto-update on your Chromecast with Google TV. The updates are thoroughly tested by Google before being released to the public.
Can I manually check for updates if auto-update is turned on?
Yes, you can manually check for updates even if auto-update is turned on. Go to Settings, then System, then About, then System update, and tap on “Check for updates.”
What happens if there’s an issue with an update?
A: If there’s an issue with an update, you can contact Google support for assistance. In some cases, you may also be able to resolve the issue by resetting your Chromecast with Google TV to its factory settings.
Conclusion
In a world where technology seamlessly integrates into our daily lives, the ability to let go of the worries about updating your Google TV every now and then underscores the convenience of smart work. In conclusion, we have taken you through a seamless journey of enabling automatic app updates on your Google Chromecast. With this feature, you can wave goodbye to the tedious task of manual updates, ensuring your apps are always up-to-date. By opting for “Auto-update apps at any time,” you’ve empowered your Chromecast to handle app updates effortlessly. No more manual intervention is required; your Chromecast will stay current with the latest app versions automatically.
Now, you can fully enjoy the versatility of your Chromecast with Google TV, exploring a world of entertainment and utility without worrying about keeping your apps in check. It’s time to sit back, relax, and let your Chromecast enhance your streaming experience effortlessly.

Passionate about tech gadgets, I turned my love into a blogging journey. Specializing in how-to articles, I unravel the intricacies of gadgets, providing step-by-step guides. Join me in exploring the tech universe, where every device holds endless possibilities. Let’s simplify the complexities and enhance your tech experience together.