The Amazon Fire TV Stick is a well known streaming device that provides a convenient and easy way to access your favorite movies, TV shows, and other online content. The Fire TV Stick remote is an essential tool for controlling your device, but like all electronics, it may require updates from time to time. In this article, we will guide you through the steps to update your Fire TV Stick remote.
Before you begin, make sure your Fire TV Stick and remote are properly paired and within range of each other. Also, ensure that your Fire TV Stick is connected to the internet.
Step 1 : Turn ON your device
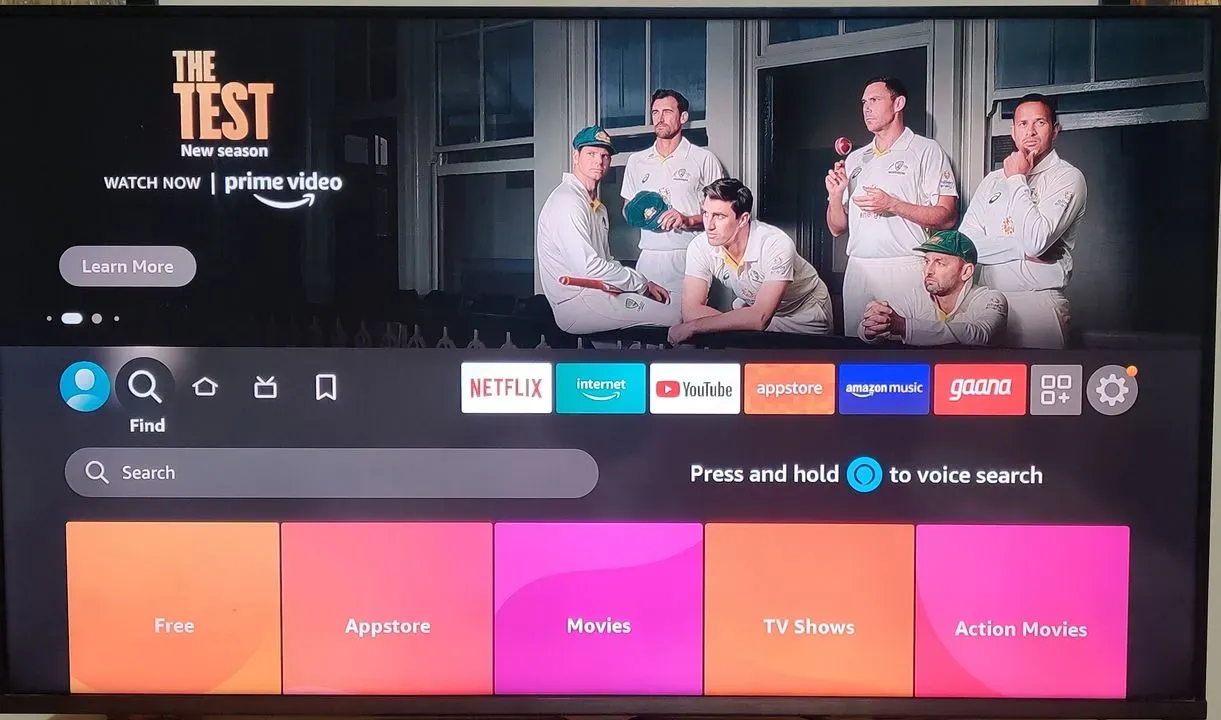
Once you have made sure that your Fire TV is properly connected to the internet, it is now important to turn your Fire TV device ON and go to the “Home Page”. If you don’t see the Home Page on your screen once you switch ON the device, press the “Home” button on your Fire TV remote access it.
Step 2 : Access “Settings”
Once at the Home Page, you may see the “Settings” icon on the right most side of the screen (as shown in the picture below). Scroll right and press “Okay” on your Fire TV remote to select and access “Settings”.

Step 3 : Access the “Controllers and Bluetooth Devices” option from the menu
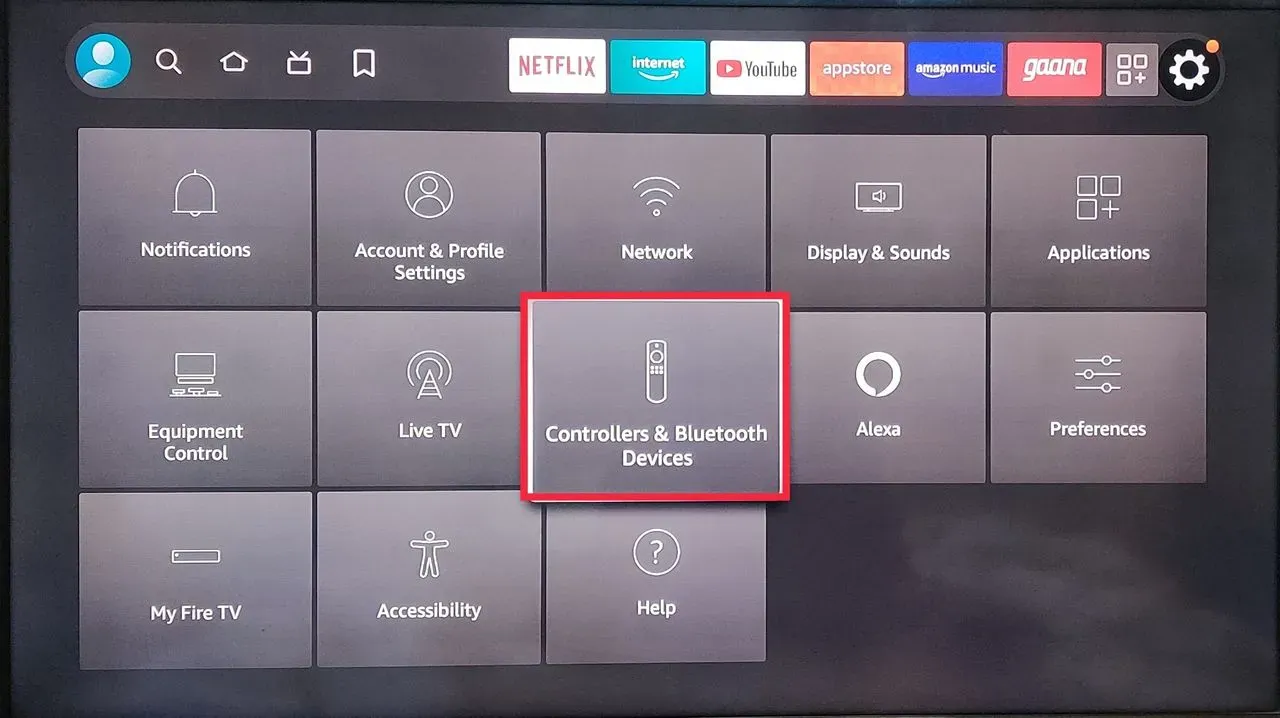
Next step is to navigate through the Settings menu options to find “Controllers and Bluetooth Devices”. Press “Okay” on your Fire TV remote once found.
Step 4 : Select the “Amazon Fire TV Remotes” tab from the menu
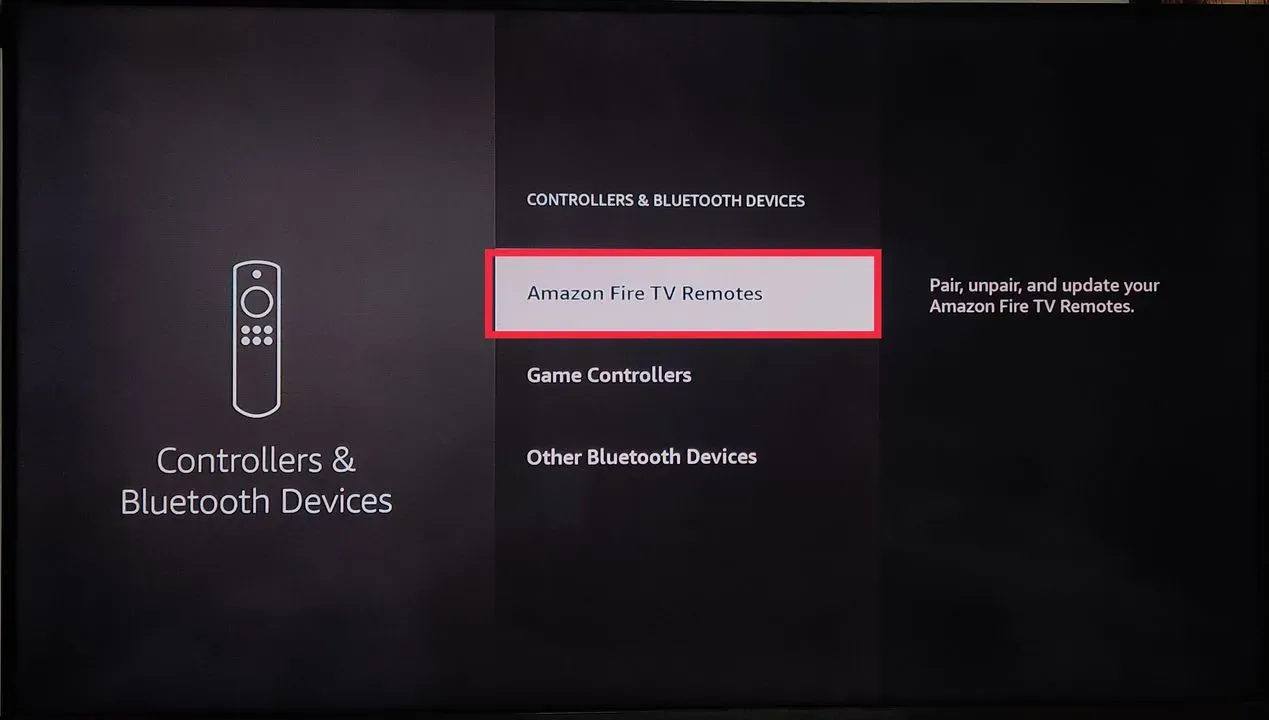
Selecting Controllers and Bluetooth Devices will give you access to a few controller options including Game Controllers. Select “Amazon Fire TV Remotes” from the options available on your Fire TV screen.
Step 5 : Select “Amazon Fire TV Remote” from the options again
You will now be shown two options on your screen. Select “Amazon Fire TV Remotes” again from the options available on your Fire TV screen.
Step 6 : Select your remote
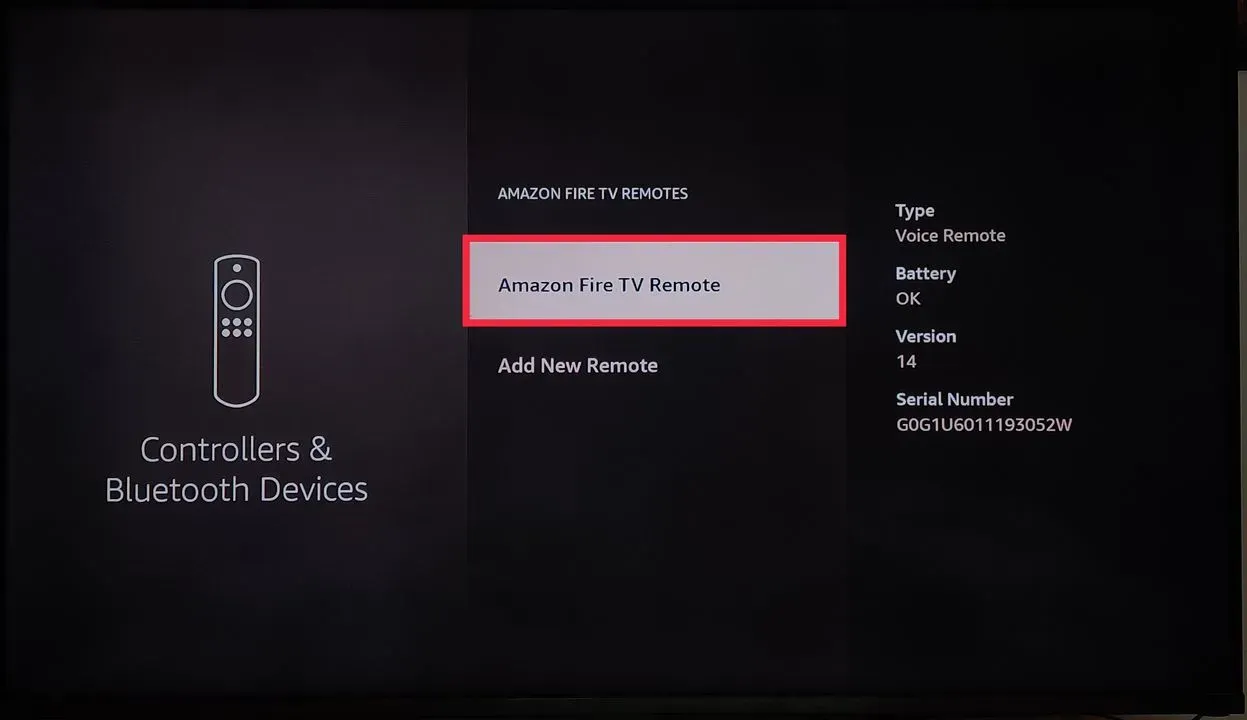
Once you select the “Amazon Fire TV Remotes” option, you should be able to see a list of remotes connected to your Fire TV Stick account. Choose your remote’s name from the list displayed on your screen.
Step 7 : Update the Remote
When you select your Fire TV Remote, You will be able to see if there is an update waiting for your Fire TV remote. If an update is available, the device will prompt you to install it. When you see the prompt, simply follow the instructions on your screen to download and install the update. You will also see a notification pop-up on your screen saying :
“This may take several minutes. Do not press any buttons on your Fire TV remote.”
Please be patient while your remote gets updated.
Step 8 : Restart the Fire TV Stick
Once the update is complete, restart your Fire TV Stick by unplugging it from the power source. Now, wait for at least 60 seconds before you turn it back on. After 60 seconds, turn it on by plugging it back in. This will ensure that the updated remote software is properly installed.
Step 9 : Check the Remote Connection
After restarting the Fire TV Stick, check the remote connection by pressing any button on the remote. If the LED light on the remote flashes, the remote is properly connected to the Fire TV Stick. If the LED light does not flash, try re-pairing the remote by following the steps in the “Check for Remote Updates” section.
If the remote still does not work, try replacing the batteries in the remote. If this does not solve the problem, contact Amazon support for further assistance.
Additionally, if you have purchased a new Fire TV Stick remote and wish to update and connect that to your Fire TV device, you may also add this remote by following the steps below:
First, Select “Settings” > Then, Select the “Controllers and Bluetooth Devices” tab > Then, Select “Add Remote”
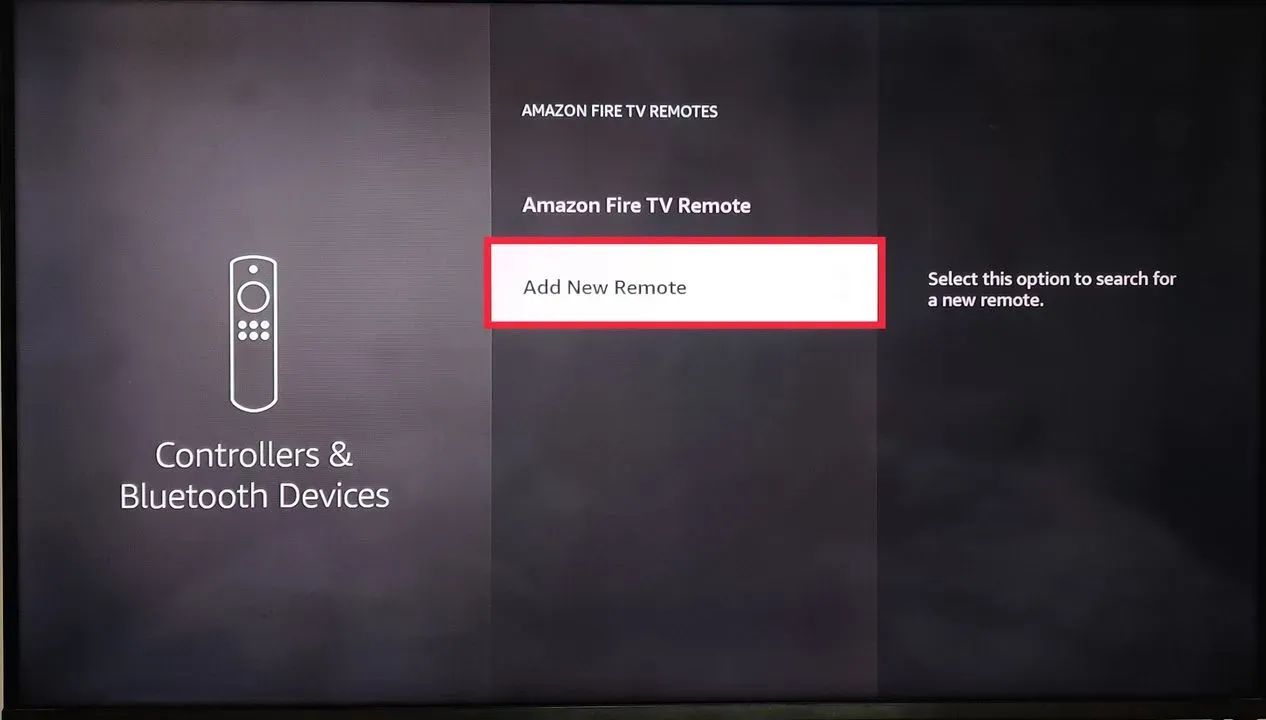
Now, follow the instructions on your device screen to add the new remote.
Once you have followed all the above steps and instructions, you will be able to access your Fire TV device with your new updated Fire TV Stick remote.
Unable to Update Your Fire TV Stick Remote
Here are the steps to update your Fire TV Stick remote’s software using different methods:
Method 1: Check for Updates Automatically
To ensure your Fire TV Stick is up-to-date, the process involves a few straightforward steps. Begin by navigating to the Home screen of your Fire TV Stick. From there, proceed to the “Settings” option. Within the settings menu, depending on your device version, you might find either “My Fire TV” or “Device”; choose the appropriate option. Next, select “About” to access information about your device.
Within the “About” section, there’s an option labeled “Check for System Update.” By selecting this option, your Fire TV Stick will automatically search for any available updates. If an update is found, you will be prompted to “Install Update.”
Allow the update to complete, which might require a brief period, and once it’s done, your device will restart. Upon completion, a notification will confirm that your system is now up to date. Regularly checking for updates ensures that your Fire TV Stick benefits from the latest features, improvements, and security enhancements.
Method 2: Reset Your Remote
If you need to reset your remote for the Fire TV Stick, these steps will guide you through the process. Firstly, remove the batteries from the remote and allow 10 seconds to pass. Subsequently, press and hold any button on the remote for a duration of 20 seconds.
Afterward, release the button and reinsert the batteries into the remote. To continue, press and hold the Home button on the remote for 10 seconds. During this time, observe the top of the remote for a blinking light.
Once you notice the light blinking, initiate the process of pairing the remote with your device by adhering to the on-screen instructions provided. Upon successful completion of this pairing, you will receive a confirmation message indicating that your remote has been successfully paired with your Fire TV Stick. This resetting process can effectively resolve issues with the remote’s functionality.
Method 3: Replace Your Batteries
To replace the batteries in your Fire TV Stick remote, adhere to these simple steps. Firstly, slide off the back cover of the remote to access the battery compartment and remove the old batteries.
Next, insert two new AAA batteries into the remote while paying attention to the polarity indicators (+/-) to ensure correct alignment. Afterwards, slide the back cover of the remote back into position, ensuring that it securely snaps into place.
To check if the remote functions properly with the new batteries, press any button on the remote. If everything is in order, you should observe a light at the top of the remote, indicating that it now has power and is ready for use. This battery replacement process ensures continued and efficient operation of your Fire TV Stick remote.
Frequently Asked Questions
How do I check if my Fire TV Stick remote needs an update?
You can check if your Fire TV Stick remote needs an update by going to Settings on your device, selecting Remotes & Bluetooth Devices, selecting Amazon Fire TV Remotes, and selecting your remote from the list. If an update is available, you will see an Update option next to your remote name.
How long does it take to update my Fire TV Stick remote?
The time it takes to update your Fire TV Stick remote may vary depending on the size of the update, the speed of your internet connection, and the performance of your device. Generally, it should take no more than a few minutes to complete the update process. However, if you encounter any issues or errors during the update, it may take longer or fail to complete.
How do I check the software version of my Fire TV Stick remote?
You can check the software version of your Fire TV Stick remote by going to Settings on your device, selecting Remotes & Bluetooth Devices, selecting Amazon Fire TV Remotes, and selecting your remote from the list. You will see the software version number next to your remote name.
How do I know if my Fire TV Stick remote has been updated successfully?
You can know if your Fire TV Stick remote has been updated successfully by checking the software version number on the Remotes & Bluetooth Devices menu. If the software version number has changed after you updated your remote, it means that the update has been completed successfully. You can also check if your remote works properly and has no issues or errors.
Conclusion :
Updating your Fire TV Stick remote is a straightforward process that can improve its performance and reliability. By following these simple steps, you can ensure that your remote is always up-to-date and ready to use. So, go ahead and update your remote today and start enjoying your Fire TV Stick to the fullest. You may also follow the steps above to add a new remote to your Fire TV device.
Please leave a comment below if you or someone you know found this article helpful.

Passionate about tech gadgets, I turned my love into a blogging journey. Specializing in how-to articles, I unravel the intricacies of gadgets, providing step-by-step guides. Join me in exploring the tech universe, where every device holds endless possibilities. Let’s simplify the complexities and enhance your tech experience together.